header

Wednesday, October 31, 2012

GBD - Fascinator and Clutch

While I've pointed out the difficulties in sewing with plastic, I have failed to share the upsides.

I made a matching clutch and the outer "fabric" was made of the vinyl/plastic material. I opted to use Pattern Runway's Free Fold-Over Clutch Pattern and it was a great choice. Since I printed this pattern at home, I was able to tape it together and then tape it directly to the plastic. No pattern weights to muss with here!


While this could potentially be a problem, I found the fact that the material clings to itself to be a great plus. Like working with leather, this material will show poke holes, so you can't pint it together. Throughout this project, I've employed two different methods of "pinning" or otherwise keeping layers together: binder clips and scotch tape.


As pictured above and below, I once again fashioned a faux teflon foot out of painter's tape. It was also important to keep the left side of the bag lifted up and away from the arm of the machine, it could get stuck there too, and did on a few occasions.


Last but not least, this material doesn't really wrinkle. This can be both good and bad, but I found it to be a pleasant experience. Once it clung to itself, it didn't budge, and movement while sewing or adjusting didn't cause the entire piece to shift, so that was a huge plus.

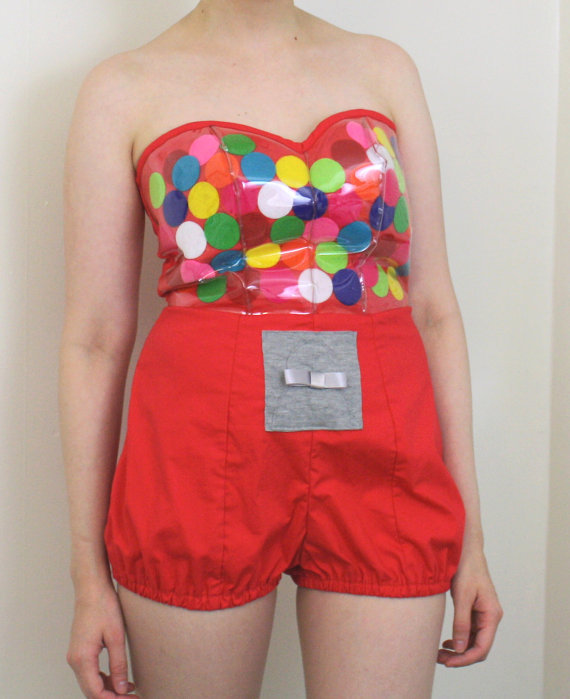
The interior of the bag was made of the same red cotton sateen, which was brought into this world as a sheet. I picked it up at Ikea from the as-is section and I believe I've given it a better life as a bag, fascinator and dress.

It was a tad challenging making those sharp corners turn out correctly, but that can be attributed to material and not to the pattern. This is a great pattern and I am looking forward to making it again.


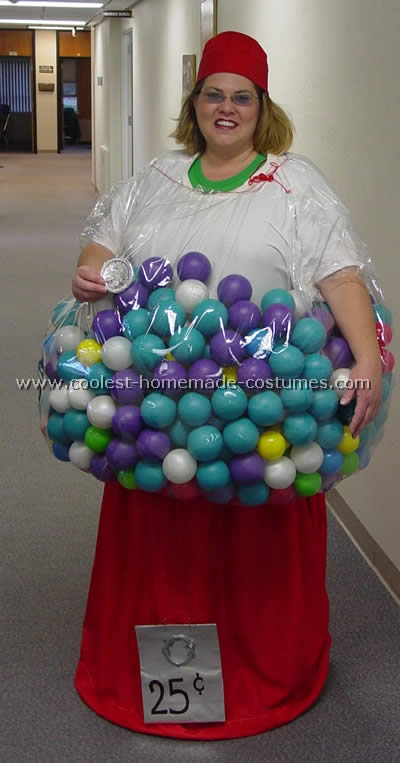
I also made a fascinator type hat. I didn't take any mid-construction shots, but here is the finished product.


I started with a half football shape, and I stuck a dart in the end to make it gently curve. Using some very stiff fusible interfacing provided some stability and the serger was a quick way to finish the edges. I got out the glue gun, securing in place the feathers, "gumballs" and some netting. Pro Tip: glue guns are hot. I only sustained one glue gun injury and I was able to go on without first aid, but after that I wised up and used cardboard to push my feathers/felt/netting into place. Lastly, one of those really great side hair combs that I had tucked away in a ziplock bag labeled "Long Hair" was glued into place and the fascinator found its perch on my head.

I will have one final post tomorrow after my friends and I go out tonight. I will leave you with this shot of me, modeling a ruff that we made for our friend who went as Tycho Brahe. 


Sunday, October 28, 2012

Guest Post on MPB!!!


You guys! I am BEYOND excited! Today I am featured as a guest blogger over at Male Pattern Boldness! If you don't read this blog, you SHOULD. Peter is a true delight, often sewing wonderful garments for himself, and for his knock-out cousin Cathy.
I joined the MPB Halloween sew-along, and I've been "live" blogging my progress so far. I finished the costume and wore it out this weekend, so I have a little catch up to do. While I work on that post and gather up some photos, head over to read my post over at MPB!

Thursday, October 25, 2012

GBD - Boning Tutorial!

This is the third time I've made this dress. Each time I've put it together up to this point, I've closely followed the directions, especially how to install the boning.

My first go round, I installed it on the wrong side of the lining, so it was showing when you saw the inside of the dress.


 The second go round, it was on the correct side, but stitching was showing through, and I really didn't like the way it looked. In addition to the looks portion, measuring the boning wasn't an exact science because of the curves of the upper portion of the bodice and the seam allowances. The first time I ended up sewing through my boning and breaking several needles.


On both versions, I used the cotton casing that came with the boning.

On this incarnation, I've got 5/8 seam allowances, so why not put them to use!? I am sure someone else has already come up with this method, but I am very excited to show you the way I installed the boning.


In the first photo, we are looking at the lining, wrong side out. You can see my 5/8 seam allowance pressed open, and on the right side, a channel I'd already sewn. You can also see in white thread, that I've sewn my lining and main fabric, right sides together. I ripped out some of this stitching because I figured out how to do this AFTER I had sewn them together. You will want to do this BEFORE sewing your main fabric and lining pieces together.

1. Determine which side of the seam allowance you want your boning to sit.
 Since I wanted my boning to sit to the right side of the seam allowance on this side of the bodice, I simply folded the left seam allowance over on top of the right seam allowance. For the left side of the bodice, I would do the opposite. This follows the general sewing idea that you should press seams away from center for a more flattering look. Press these channels to the correct side.

2. Sew the seam allowances together to create the channel.
I ran the first set of seam allowances through my sewing machine, but the remaining three (there are four seams with boning in them) I ran through the serger. Just sew the seam allowances together to create a tube/channel.


3. Press channel flat against the bodice.
The channel should be pressed flat against the bodice to whichever side you want the boning to lay.

4. Sew your lining piece to your main fabric.
The pink dots indicate where you are sewing your lining and main fabric together, just as you normally would. In the photo, my lining piece and my main fabric are right sides together. When sewing them together, make sure your channels are flat and on the correct side and don't shift during sewing. This will close the top of the channel.


5. Slide boning into the channel.
In the photo above, I am sliding the boning into the channel. At this point, you should measure the boning to fit, minus seam allowance for the attaching your skirt piece or midriff to the bottom of the bodice. In this case, I chose to use a smaller seam allowance at 1/4, so I removed 1/4 from the boning length. The boning will not reach to the bottom. This is good, as you don't want to sew over it.

Once you attach your skirt or the midriff piece, the channel will be completely enclosed and should look like this from the inside of your garment:


No pesky lines, a very nice, clean finish!
This was my very first tutorial, I hope you have found it helpful. I did a lot of sewing over the weekend, so I hope to post more about my progress soon!

Wednesday, October 24, 2012

GBD - Sewing Plastic

Over the years I have read many blog posts about sewing. Many of them were about topics I had not yet tackled, but this information found a home in my brain and at the right time, I've been able to use it.
Sewing with plastic is essentially the same as sewing with leather, albeit a little less luxurious. I relied heavily  on some awesome blog posts, in particular on these done by Sallie Oh, and Lindsay T Sews.

I do not have a teflon foot, but I have a roll of painters tape and a box of binder clips.

Outside, taped and ready for basting stitches.

Ultimately, I was working with three layers. I had my lining layer, my main fabric and the plastic layer. I ended up placing the felt gumballs, and laying the plastic bodice over top, trapping them between. I then basted these two together to treat as one unit for the remainder of construction.

Inside of the main fabric, taped and ready for basting stitches.
There are some very tricky curves and these two layers absolutely HAD to be pinned or otherwise kept together. I ended up using scotch tape to keep them aligned. I sewed right over the tape and pulled it up after stitching. This worked very well. I use scotch tape for many things such as holding buttons in place while I'm machine stitching them, holding zippers in place and pattern alterations. It's an invaluable tool in the sewing room!


Painter's tape faux teflon foot to the rescue!

The teflon/painter's tape foot comes into play when sewing the plastic and main fabric layers together. I didn't want the feed dogs roughing up the plastic, so I had to sew plastic side up.


Faux teflon foot in use.

At first, I didn't realize it wouldn't run smoothly under the normal foot. As soon as it started sticking, I just grabbed the painters tape and covered the foot. It was a super easy fix that worked like a charm.

After sewing, prior to pulling up the scotch tape.

Once I had the main bodice unit put together, I then stitched lining and main fabric right sides together. I installed the boning (I'm working on a tutorial to show you guys how I did it) and used binder clips to "press" the upper seam. I left it clipped over several days and as I was working on installing the midriff.

"pressing"

fitting!


Saturday, October 20, 2012

GBD - Sewing Plastic & Placing Gumballs

We've got progress!!!

The GBD is now starting to take shape. Sewing with plastic/vinyl is an entirely different beast though, let me tell you!


I used scotch tape to place the felt gumballs. Once they're trapped between the vinyl/plastic and the fabric I am sure they will stay put nicely.


My next set of goals are: attach lining pieces and midriff. This includes boning. Woot!

Wednesday, October 17, 2012

GBD - Sewing the Bodice & Thoughts on Scissors

Costume Contest


First things first. I intend to enter the Gumball Dress (GBD) into the costume contest on pattern review. I'm not super active on the site for a number of reasons, but here is a link to my profile.

Last night I cut out the remaining outer bodice pieces and sewed together the bodice lining .


I had a little trouble with the curves this time, so I used a TON of pins and while it felt counter-intuitive, I stitched over the small bits of puckering. Even prior to pressing, hand smoothing shows the seam will lay correctly, so the puckers aren't a big deal. I also cheated and didn't stay stitch. OH WELL!

Since this is the third time I've made this dress, and I really like the pattern, I had an idea. The bodice is made of four small pieces, midriff is two and the skirt is two. I photocopied the four bodice pieces for a couple of reasons:

1) I will be cutting out plastic and will NOT be using my rotary cutter or my fabric scissors.*
2) I've used this pattern a lot and the tissue is getting wonky. I am lazy and tracing is so much work.


One of the awesome parts about these pattern pieces being on paper, is that when it comes time to cut out the plastic, I plan on using double stick tape and my paper scissors. That's going to make this a lot easier. No pattern weights for me!

*A story.

Devon and her friend stopped by while I was working on a project. We were going to go watch the sunset on my roof, so they came into my apartment and waited while I arrived at a good stopping point. While I was tidying something, he reaches for my sewing scissors and starts playing with them. He picks up some fabric, some paper. At this moment, Devon and I see this happening and simultaneously raise our voices and reach for the scissors like hawks, saying, "THOSE AREN'T FOR PAPER."

He was slightly stunned and possibly embarrassed and immediately put the scissors down. We each trade stories about growing up and not using the sewing scissors for anything but fabric. EVER. Thanks, Mom!

It truly is a good habit to have. I come from a Gingher household, so I have several pairs in varying attributes  I recently-ish bought a new pair of paper scissors, and picked up the nylon handled dressmaker shears. They are very light and super sharp, as you'd expect from a pair of Ginghers, and since they are black they really stand out from the rest of the scissors in the lineup.

Tonight's goals:

Get the plastic cut out, install boning on the lining and figure out how I'll be attaching the plastic layer to the outer fabric. I've been thinking I'd just place my felt gumball pieces and then lay the plastic over top, basting the outer fabric and plastic together and treating as one unit, much like you would do for underlining.


Tuesday, October 16, 2012

Gumball Progress - Cutting

Last night right after work I met up with Devon at the craft store, where she curated some felt for my gumball pieces.

I picked up some boning and I found they stock some great plastic-type material that's going to serve as the "glass" on the bodice. We originally thought about just picking up a shower curtain, but this was exactly the type I wanted, and at $4.95/yard was bound to be cheaper than a shower curtain. Since it's plastic it's not really fabric...right?

Dinner to fuel us through the cutting!

We had dinner before setting in to work on the cutting. I decided to go with the same silhouette that I used for the burger dress (McCalls 5850) for a few reasons. First off, the inspiration post featured mostly strapless dresses with sweetheart necklines and I think this really fits perfectly. Second, this will be the third time I've made up this particular pattern so I won't have any construction surprises.

Can you spot the stash?
The outside of the dress will be red, but for the lining of the bodice I wanted to really dip into the stash.This is just quilting cotton leftover from a project my mom worked on several years ago making scrubs for a friend who was working as a Vet Tech. Super fun and colorful, and another stash piece taken care of, win-win.


The lining pieces for the bodice and the midriff have all been cut. I also got the main skirt pieces cut as well. Tonight I'll be cutting the red bodice and midriff pieces, and will begin sewing!

Monday, October 15, 2012

success and halloween thoughts

I went to Joann's with my housemate yesterday so she could procure fabric for her cape for her halloween costume.

I FOUND THE TEMPLATE FOR MY GRANDMOTHER'S QUILT!!!! and I purchased it for $5 bucks, because Joann's is always doing sales. w00t!


dresden template


I thought about doing a halloween costume again this year. I considered being a mermaid, but after realize I am not allowed to buy more fabric, I couldn't justify this. Let's face it, I just wanted to buy sparkly/sequined fabrics.

Devon sent me a link to the below, and things have just spiraled out of control.

source


source


source
source
I do this to myself every year. Today is the 15th. I'm going to be putting the gumball dress together and documenting it here!

I've also been working on my peony muslin, but it needs a lot of work. This is more fun!

Friday, October 5, 2012

Sailorette in Action


Oh hey! My niece is probably the most adorable ever!!! 
 
 Here she is sporting the tiny sailorette outfit, complete with snaps (cheating on the ill-fated button holes!) and cheese grin. This is a new phase for her, as she is normally pretty studious and laid back. 


She looks JUST like my sister in law in this photo above left, where she's waiving good-bye and pretending to leave out the front door. 
 
I think the outfit is super adorable on her, the shirt looks a tad big but with how fast littles grow, she will fit it in no time! I highly recommend this pattern. It is well drafted and easy to put together.
Next Post Previous Post Home